Web / SNMP MANAGEABLE
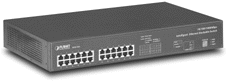
SGSW-2403
24-Port 10/100/1000Mbps stackable switch
Before installing the switch verify that you have all the items listed under "Package Contents." Also be sure ou have all the necessary tools and cabling before installing the switch. Note that this switch can be installed on any suitably large flat surface or in a standard EIA 19-inch rack. After installing the switch, refer to the Management Guide to set up its more advanced features, such as Spanning Tree Protocol or VLAN port groups.
This package includes:
The base unit contains 12/24 10BASE-T/100BASE-TX ports, plus three slots on the rear panel for various modules. An agent module must be installed in the upper slot on the rear panel (see page 3). The lower-left slot can be used for an optional media expansion module or stacking module, while the lower-right slot can be used for a media expansion module. Note that the media expansion modules include a Fast Ethernet fiber optic module with two 100BASE-FX (SC type) ports or a Gigabit uplink module with one 1000BASE-SX (SC type) port.
All RJ-45 ports operate at 10 or 100 Mbps, and support auto-negotiation of speed, duplex mode (i.e., half or full duplex), and flow control. While the Gigabit module operates at 1Gbps, and supports auto-negotiation of duplex mode and flow control. Note that when using auto-negotiation, speed, transmission mode, or flow control can be automatically set if this feature is also supported by the attached device. Otherwise, these items can be manually configured for any connection. Also, please note that the 100BASE-FX module is fixed at 100Mbps, full duplex.
The base unit also includes a display panel for key system and port indications that simplify installation and network troubleshooting.
The following figure shows the components of this switch system:


This switch can be placed directly on your desktop, or mounted in a rack. Before you start installing the switch, make sure you can provide the right operating environment, including power requirements, sufficient physical space, and proximity to other network devices that are to be connected. Verify the following installation requirements:
2.3.1 Stacking Switches on a Flat Surface
2.3.2 Mounting Switches in a Rack
Please comply with the following instructions to ensure that your switch is securely mounted in the rack.
The slots on the rear panel of the switch are provided for various modules - the required management module, or the optional media expansion (fiber optic or Gigabit) or stacking modules. One management module is required to manage all of the switches in the stack. (Only one management module may be installed in the stack for the current firmware release.) The fiber optic module can be used to connect to remote sites. And the Gigabit module can be used as a network backbone. You must install the management module in the upper slot, the media expansion modules in either of the lower slots, and the stacking module in the lower left slot. You can install a module as described below:
|
|
The slide-in modules are not hot-swappable. Be sure you power off the switch before installing any of these modules. |
2.5 Connecting to
the Stack's Backplane
Plug one end of the stack cable (provided with the package) in the "Down" port of the top unit and the other end to the "Up" port of the next unit. Repeat this step for each unit in the stack. Form a simple chain starting at the Down port on the top switch and ending at the Up port on the bottom switch (stacking up to 4 units).
2.6 Connecting the Switch System
The Switch provides 12/24 RJ-45 ports on the base unit. Each of these ports supports connection to 10Mbps Ethernet or 100Mbps Fast Ethernet, and supports full or half-duplex operation. The transmission speed for each port is automatically set by the switch to match the highest speed supported by the connected device. The transmission mode can be set for each port using auto-negotiation (if also supported by the attached device). However, if the device attached to any port on the switch does not support auto-negotiation, you can manually configure the transmission mode via the console port on the rear panel, or via an in-band connection (including Telnet, the Web agent).
2.6.1 Making a Connection to an RJ-45 Port
You can use straight-through twisted-pair cable to connect any RJ-45 (MDI-X) port on the switch to any device that uses a standard network interface such as a workstation or server, or to a network interconnection device such as a bridge or router (depending on the port type implemented).
|
Do not plug a phone jack connector into any RJ-45 port. This may damage the switch. Instead, use only twisted-pair cables with RJ-45 connectors that conform with FCC standards. |
NOTES: |
|
Restrictions on Cascade Length - The IEEE 802.3 standard recommends restricting the number of hubs (i.e., repeaters) cascaded via twisted-pair cable to 4; while IEEE 802.3u provides even stricter recommendations for Fast Ethernet. Therefore, when cascading devices other than this switch, please refer to the accompanying documentation for cascade restrictions. However, note that because switches break up the path for connected devices into separate collision domains, you should not include the switch or connected cabling in your calculations for cascade length involving other devices.
2.6.2 Connecting
to a Fiber Optic Port
If you connect fiber cable to the fiber optic module, be sure you use an SC-type connector. When inserting the cable, be sure the tab on the plug clicks into position to ensure that it is properly seated. If you use an SC-to-ST converter (for 62.5/125 micron cable only), run cable from the Rx (Tx) port on the module to the Tx (Rx) port on the target device. Note that the fiber optic ports operate only at 100 Mbps, full duplex. In this mode, you can run a fiber optic link up to 2 kilometers (1.24 miles).
The media expansion modules are not hot-swappable.
Be sure you power off the switch before installing any of these modules.
NOTES: |
As a general rule, the length of fiber optic cable for a single switched link should not exceed 2 kilometers (1.24miles). However, timing constraints must also be considered when calculating the maximum cable length for your specific environment. |
2.6.3 Connecting to a Gigabit Uplink Port

If you connect fiber cable to a Gigabit module on the switch, be sure you use an SC-type connector. When inserting the cable, be sure the tab on the plug clicks into position to ensure that it is properly seated. If you use an SC-to-ST converter (for 62.5/125 micron cable only), run cable from the Rx (Tx) port on the module to the Tx (Rx) port on the target device.
The Gigabit module operates at 1 Gbps, with support for auto-negotiation of duplex mode and flow control. Also note that while the maximum cable length for 100BASE-FX fiber optic cable depends on the duplex mode, the maximum cable length for 1000BASE-SX fiber is the same for both full and half duplex, as shown in the following table.
Fiber Size |
Fiber Bandwidth |
Maximum Cable Length |
62.5/125 micron |
160 MHz/km |
2-220 m (7-722 ft) |
200 MHz/km |
2-275 m (7-902 ft) |
|
50/125 micron |
400 MHz/km |
2-500 m (7-1641 ft) |
500 MHz/km |
2-550 m (7-1805 ft) |
NOTES: |
The unit supports a "hot remove" feature which permits you to connect or disconnect twisted-pair or fiber cables without powering off the switch and without disrupting the operation of the devices attached to the switch. |
2.8 Verifying Port
Status
Check each connection by viewing the port indicators
shown in the following table.
LED |
State |
Indication |
System |
||
Power |
On |
Switch is receiving power. |
RDP |
On |
Redundant power unit on. |
Mgmt |
On |
Management agent operational |
RJ-45 Ports |
||
Link |
On |
Port has established a valid network connection |
|
Yellow |
Communications have been set to 10 Mbps. |
|
Green |
Communications have been set to 100 Mbps. |
|
Flashing |
Port has been manually disabled, or partitioned by the system due to excessive errors. |
Activity* |
On |
Traffic is passing through the port |
FDX* |
On |
been set to full duplex |
FC* |
On |
Flow control enabled. |
Module Ports |
||
Status |
On |
A module is installed in this slot. |
Activity |
On |
Traffic is passing through the port. |
* Use the Mode Select button to select LED display mode. |
||
2.9 Verifying System Operation
Verify that all attached devices have a valid connection. The switch monitors the link status for each port. If any device is properly connected to the switch and transmitting a link beat signal, the Link indicator will light up for the corresponding port. If the Link indicator fails to light when you connect a device to the switch, check the following items:
This switch segments your network, significantly increasing both bandwidth and throughput. Any port on the switch can be attached to a hub (a shared collision domain) or provide a dedicated link to a single network device (such as a workstation or server). When a port on the switch is connected to a hub (a 10 or 100 Mbps repeater), the bandwidth provided by that port is shared by all the devices connected to the attached hub. However, when a port is connected to an end node or to a device that breaks up the collision domain (e.g., another switch, bridge or router), the attached device has access to the full bandwidth provided by that port.
Bridging Functions - This switch provides fully transparent bridging functions. It automatically learns node addresses, that are subsequently used to filter and forward all traffic based on the destination address. When traffic passes between devices attached to the same shared collision domain, those packets are filtered from the switch. But when traffic must be passed between unique segments (i.e., different ports on the switch), the high-speed switching fabric forwards the packets at near zero latency.
Switching Functions - Store-and-forward switching is used to forward traffic to other ports. This scheme ensures data integrity and provides a clean data stream. Flexible Configuration - This switch is not only designed to segment your network, but also to provide a wide range of options in setting up network connections. It can be used as a simple stand-alone switch; stacked up to four high; or connected with standard repeater hubs, switches, or other network interconnection devices in various configurations.
Media Expansion Options - You can use a Fast Ethernet fiber module to connect to remote sites up to 2 kilometers (1.24 miles) away, or a Gigabit module to support applications such as high-speed file servers, or for connecting to a collapsed Gigabit backbone switch.
|
|
|
Copyright (c) 2001, Planet Technology Corp. |
